Thursday, September 26, 2013

Saltimbocca


Hi Everyone,

Welcome back to Nonnina's Kitchen!  

Today Nonnina and I cooked up something sure to be a show stopper at your next dinner.  Saltimbocca - for those of you who look at this word and see a giant question mark, the literal translation, means "Jump In Your Mouth" which is funny because when you try these bad boys they'll literally be jumping in your mouth!

This recipe was adapted from Nonnina's mother-in-law, my Great Grandmother.  She told me that when she first married my Nonno and her mother-in-law made this recipe, everyone one LOVED it.  So when she started making it for her own family and modified the recipe to be her own, she said the compliments just poured in.  

I have enjoyed this recipe my whole life but actually helping Nonnina make it today made me appreciate just how special they are! I hope you all enjoy them as much as I do!


Ingredients


Makes approximately 12 skewers
  • 8 veal scallopini (can be found at any butcher shop)
  • 1 tbsp vinegar
  • 1 tbsp of extra virgin olive oil
  • 1 tbsp white wine
  • 1 cup of flour
  • 1 cup of bread crumbs
  • 2 eggs
  • Wooden Skewers
Directions

1. Preheat the oven to 425℉ on Convection bake.
2. Slice the veal scallopini into stripes about a ½ inch in width.


3. Season the scallopini strips with salt and pepper.

4. In a medium bowl, mix the seasoned meat with olive oil, vinegar and white wine.


5. Put the meat in the fridge and let it marinate for a couple of hours.

NONNINA'S TIP* Let it marinate over night to make the meat extra tender.

6. Once the meat has marinated, take a wooden skewer and puncture the veal with it.


7. Once punctured, twist the strip and puncture it again feeding the entire strip of veal onto the skewer.  Once you've completely weaved the strip through, push it down to make room for the second strip. Do this again with a second strip.  (Use approximately 2 strips per skewer)


8. Repeat these steps until all the skewers are filled.


9. In a glass Pyrex dish, break 2 eggs, add the buttermilk and whisk it all together until combined.

NONNINA'S TIP* If you do not have buttermilk you can substitute it with 18% cream.


10. Next, measure 1 cup of flour and pour it into a dish.

11. In another dish pour 1 cup of breadcrumbs and lightly season.

12. Line a baking sheet with parchment paper and grease it with Canola Oil.

13. Take a skewer, roll it in the flour, shaking off any excess flour.


14. Next, dip the skewer in the egg wash, shaking off the excess egg.


15. Following the egg wash, put the skewer in the breadcrumbs rolling it around, making sure to coat it well.  Pack it with your hands if needed.


16. Place all coated skewers on the baking sheet, lightly brushing them with oil. 


17. Put in the oven and cook for 25 - 30 minutes, turning the skewers half way through cook time.

NONNINA'S TIP* For a healthier option Nonnina bakes her skewers, however they can also be fried.

18. Once finished, layer them on paper towel to absorb excess oil.


We hope you enjoy this week's recipe! 

Make sure you check out the new email subscription feature on my page for all my Non Bloggers - Subscribe by email to get all our posts sent directly to your inbox! >>

Buon Apetito!

With Love From, Nonnina!

Sunday, September 22, 2013

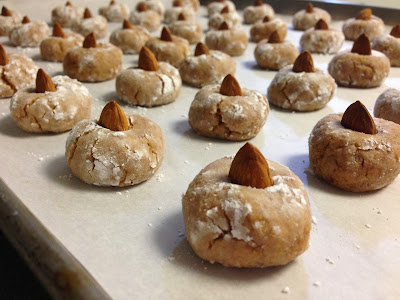
Amaretti Con Savoiardi

Hi Everyone!

Thanks for visiting us at Nonnina's Kitchen, where we post new recipes every week!
This weekend we celebrated both my sister and my step sister's birthdays.  This was cause for a big celebration and that means a lot of mouths to feed.  If she isn't hosting the party, Nonnina always brings one of the many family favourites to celebrate the occasion.  This time Nonnina brought her Bocconotti, which we made last week and Amaretti con Savoiardi which are one of my all time favourite Italian cookies.  

Part of the reason why I love writing this blog is because I get to spend a TON of time with one of my favourite people ever, Nonnina. She is getting really excited about the blog and the recipe that she wanted to share with you this week is the Amaretti.

The Amaretti are traditionally made with almonds only as the main ingredient but this version Nonnina adds Savoiardi cookies to make it a little more chewy.  We will be sharing the other version later in the blog so check back later!


Ingredients
  • 24oz of roasted and finely ground almonds
  • 28 lady fingers (Savoiardi) finely ground
  • 16oz white sugar
  • 7 large egg whites
  • 1 bottle of almond extract (43 ml bottle)
  • 1 full tsp of lemon rinds
  • Pinch of Cream of Tar Tar
  • 1 cup of icing sugar
  • Almonds to garnish
Directions

1. Pre-heat oven to 350 degrees.

2.  Grind ladyfingers in a food processor, making sure they are very fine.  Grind 14 cookies at one time and then grind another 14 to ensure consistensy.


3. Grind the almonds.  When grinding, add 1 tablespoon of sugar.

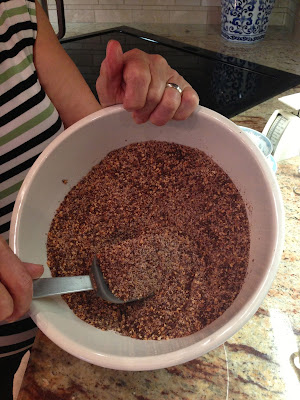
4.  Mix the ground almonds, ladyfingers, and remaining sugar together.  Make sure all the dry ingredients are combined well.  Add 1 full teaspoon of lemon rinds to the mixture.


5.  Separate the eggs yolks from the egg whites.  The egg yolks are not needed for this recipe.


6. Beat the egg whites on high speed until the mixture is fluffy.  Add a pinch of cream of tar tar when mixing.

7.  Once eggs are fluffy add a little bit of dry mix at a time, folding NEVER mixing.


8. While you're folding together your ingredients, pour in one full bottle (43ml) of almond extract and continue mixing until all combined.


Nonnina's Tip* The dough balls turn out even better if you let the mixture sit in the fridge for a couple hours. 

9.  Lay parchment paper down on a cookie sheet.

10.  Pour icing sugar into a dish.  Using a teaspoon, scoop the mixture into your hand and roll the dough into about 1 inch balls.


11.  Placing the balls of dough in the icing sugar, roll it around until it is completely covered.


Nonnina's Tip* Make sure to shake off the excess icing sugar before putting the dough balls on the cookie sheet. 

12.  Place the dough balls 1 inch apart on the cookie sheet.


13.  To garnish the cookies, take raw almonds and using a sharp knife, cut them in half and use the pointy end of the almond to place in the centre of the dough balls.  Do this BEFORE you put them in the oven.


Nonnina's Tip* Be careful not to push the almond tops too far in to the cookie.

14.  Place the cookie sheet on the second rack in the oven and cook for 12-15 minutes.

Nonnina's Tip* Turn the cookie sheet around halfway through the bake time so the cookies cook evenly.

15.  Let cookies cool before serving.

Thank-you everyone for your support! Make sure to follow our blog where we post new recipes every week!

Buon Apetito!

With Love From, Nonnina!

Thursday, September 12, 2013

Bocconotti

Hello Everyone!

Welcome back to Nonnina's Kitchen!

Today I went to visit Nonnina at her place and she just so happened to be making a fan favourite around my house, her traditional and famous Bonnonotti!  These cookies are traditionally brought to BIG parties, I'm talking: weddings, confirmations, communions, basically any gathering involving a lot of people and a lot of food.  These just happen to be MY personal favourite as well as all my other cousins.  Because these have become such a hit in our family, Nonnina makes these more often then not just for birthday dinners and sometimes if we're lucky...she'll make them by request! Enjoy!


Ingredients - makes approximately 40 cookies
Outer Shell:
  • 8 eggs yolks only
  • 8 tbsp of Canola Oil
  • 8 tbsp of granulated sugar
  • 1 2/3 cups of flour
Filling:
  • 12 oz. of roasted almonds
  • 8 egg whites
  • 8 oz. of granulated sugar
  • 1 tbsp cocoa
  • 8 squares of semi sweet chocolate
  • 1 grated lemon (rinds only)
  • ½ tsp cinnamon
  • Pinch of cream of tartar
Directions
To start off the recipe it is best if you prepare all the ingredients before hand because this recipe has many different steps. Although very EASY, if you're not organized, it can get confusing.

  1. Preheat the oven to 350℉.
  2. Finely grind the roasted almonds in a food processor.
  3. Chop up the chocolate squares finely like the almonds using a sharp knife.
  4. Measure out all your dry ingredients.

  4.  In a large bowl, mix together the almonds, chocolate, sugar, cocoa, lemon rinds, and cinnamon until all are combined.

Outer Shell:
   5.  To make the outer shell, begin by separating the egg yolks from the egg whites in 2 separate     bowls.
   6.  Once separated, put the egg whites in the fridge covered, until you need them for the filling.


  7.  Add Canola oil and sugar to the eggs and whip them together in a mixer until the mixture begins to look pale, about 2 minutes on medium speed.


  8.  Mix in the flour taking a little bit at a time making sure to combine everything.  The dough is not supposed to be too hard or too soft.  DO NOT use a mixer, use a spatula because you need to make sure the consistency is correct.

NONNINA'S TIP* you know the dough is ready when it does not stick to the bowl or your hands.


  9.  Spray all the metal shells VERY well with Canola Oil PAM so the dough does not stick to the shells.  If you do not have Bocconotti shells you can use any tartlet moulds, or find them at any specialty kitchenware store.


  10.  Drain any excess or pooling Canola oil from your shells.

NONNINA'S TIP* if there is not enough PAM on the shells, the dough will stick and they will be no good.

  11.  Roll the dough into 1 inch balls and place them inside the metal shells.  Push the dough into all the ridges of the shell, stopping when the dough is slightly above the rim.  Repeat this for all shells.


  12.  On a baking sheet, place the shells side by side.

NONNINA'S TIP* if you do not want to get your baking sheet dirty, Nonnina puts parchment paper down before putting the shells down.


Filling:

13.  Putting the shells aside, take the egg whites out of the fridge and beat them on medium speed for a couple seconds then add the pinch of cream of tartar.

14.  Beat on high until white and fluffy.


15.  Remove the egg whites from the mixer and fold in the dry ingredient mixture a little bit at a time until all combined.  It is important to make sure that you DO NOT mix, just fold the ingredients together to ensure that the mixture remains fluffy.  Make sure all the dry ingredients are coated.


16.  Using a tablespoon, take a good size scoop of the mixture and place it in each shell.


17.  Place the baking sheet on the second rack from the bottom in the oven.


18.  Rotate the tray about ten to twelve minutes into the baking time so that the cookies can bake evenly.  Cook them for about 20-25 minutes, or until the top is golden brown.

19.  Let the cookies cool completely and then dust with icing sugar.


Don't forget to follow my blog to get new recipes and see what's cooking in Nonnina's Kitchen EVERY week!

Buon Apetito!

With Love From, Nonnina!

Sunday, September 8, 2013

Stuffed Peppers


Hello again and welcome back to Nonnina's Kitchen!

All my fellow Italians out there know that this is the season for roasted peppers!  For all of you who are unfamiliar with this tradition, it consists of 3 major aspects:

  1. A couple bushels of peppers
  2. A small charcoal barbecue
  3. A garage
Alongside the freshly roasted peppers comes the delicious recipe that Nonnina and I are going to share with you today, stuffed peppers.


In September, as school is about to begin all my neighbourhood garages are filled with Nonnas and Nonnos making fresh tomato sauce, shelling beans and roasting red peppers.  I was fortunate enough to be passing by Nonnina's the other day to take part in the red pepper bonanza!


Today I introduced my Nonnina to the idea of this "blog" after much confusion and consideration she finally said "Maybe Oprah will call me!" and ran upstairs to do her makeup. Forty minutes later of prepping, we began our lesson on her mom's stuffed pepper recipe passed down through generations.  She tried to contain her excitement and play it off as no big deal, but she recited to me the recipe as if she was Julia Child herself.


Ingredients:

Stuffing
  • 3 cups of cooked organic brown and wild rice mix
  • 8-10 large Red Shepard peppers
  • 2 tbsps of Olive oil
  • 3 finely chopped shallots
  • 1½ pounds of ground meat (any type of meat you prefer)
  • ¼ cup of white wine
  • 1 cup of parmesan cheese
  • 1 cup of crumbled feta
  • 1 tbsp fresh chopped basil
  • 1tbsp fresh chopped parsley
  • 2 cloves of finely chopped garlic
  • 2 large eggs
 Tomato Sauce
  • 1 can of diced tomatoes
  • 2-3 tbsp dried basil and parsley
  • 2 tbsp of Olive oil
Preparation:
  1. Begin by preheating the oven to 400℉
  2. Bring a pot of water to boil, and pour in your rice.  Let that boil until fully cooked.

NONNINA'S TIP* for a healthier option, instead of using white rice, Nonnina uses a mix of brown and wild rice.


3. While the rice is cooking, in a large sauce pan heat up the olive oil.  In the same sauce pan, add the chopped shallots and season with sea salt and herbs to taste. Sauté the onions until they are translucent.

4. Once translucent, add the ground meat to the pan.  Let the meat cook until all the juice evaporates, then add the white wine.  Let that sauté another 10 minutes in order for the wine to absorb.


5. Once the rice is finished cooking, make sure to drain the rice COMPLETELY before you add it to the meat.  Measure out 3 cups of cooked rice and mix it in with the meat.  Put the mixture to the side to let cool.

NONNINA'S TIP* for a carb free option, you can 
substitute the rice for mushrooms.


6.  In the mean time, clean your peppers.  Cut the tops off making sure to keep the stems still in tact and save them, then hollow out the pepper.                                                                                                            

NONNINA'S TIP* if possible, use the freshest ingredients, Nonnina uses basil and parsley from her own garden.


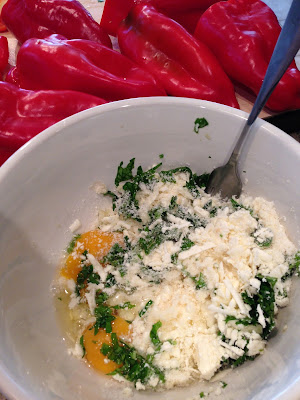
7.  In a separate bowl, mix together the parmesan cheese, feta cheese (you can also use mozzerella), basil, parsley, garlic, and eggs. 


8.  Fold the cheese mixture into the now cooled rice and meat mixture, making sure everything is evenly combined.

9.  Fill the peppers with the mix, making sure the stuffing goes all the way to the bottom of the pepper. 

10.   Coat the stuffed pepper with olive oil and put them into a lightly oiled glass pan.  Place the tops back on the peppers; if they do not stay, you may choose to fasten them with a toothpick.       


11. Place the stuffed peppers in the oven for thirty minutes.  A good way to tell when they are done is when the skin of the peppers start to blister.

NONNINA'S TIP* for a tastier option, you can add 
tomato sauce as a final step.


If choosing to add tomato sauce, heat up the sauce for about 10 minutes, adding 2-3 tablespoons of parsley and basil, and 2 tablespoons of olive oil.  After adding the sauce to the peppers, put them back into the oven for fifteen minutes and your peppers are ready to serve!